-40%
0.5% K507 Current & Voltage transformers calibrator meter an-g Agilent
$ 330.19
- Description
- Size Guide
Description
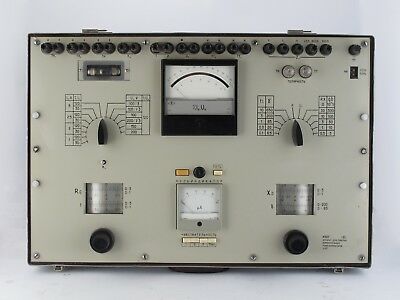
High precisionMeasurement set K507
analog of Lutron,
Advantest, Avtech,
HP Agilent,
NoiseCom,
General Radio, Boonton, Anritsu, Fluke and general Electric, but has the same or better characteristics.
This device can be used for wide measurement
range
.
Device
(measurement set
),
K507
is designed
for zero
-differential
calibration method of
current and voltage measuring transformers with
accuracy classes
0.05, 0.1
, 0.2,
0.5, 1
, 3,
10
with
secondary
nominal
currents
1A
,
2A
, 2
.5A
, and
5A
and
nominal
secondary
voltage
100V
,
150V
and
200V
active and reactive
components of
resistance
and
admittance
into
secondary
circuits
of verification transformers at 50Hz frequency.
Device
K507
makes it possible to
measure in verification transformer
process
of
active and reactive
components of
resistance
and
admittance
into
secondary
circuits
of verification transformers
.
Besides
,
device
K507
can be used
as
rectangular-
coordinate
AC
potentiometer
for voltage measurement
up to
5
mV.
Device K507
is designed to be used
in dry
heated rooms
at an ambient temperature
of +10
to +85 °
C and relative
humidity up to
80% (
at
temperature of +30 °
C).
Condition:
NEW (not used, an old stock). Tested and 100% workable.
If necessary, we can provide calibration certificate from Government standardization institute
(+145-265usd).
Also we can provide other resistance, capacitance and inductance standards, decade box and other etalons.
Also we can provide other resistance, capacitance and inductance standards, decade box and other etalons.
Please take a look on my other items!
If you haven’t found the needed item in my listing, please contact me. I’ll try to help you.
Technical
characteristics of devices
measurement set K507
:
Measurement
error limits at
current transformers
calibration and device
K507
acceptable
basic
error
limits are shown in table
1.
Table 1
Measurement
limit
designation
Measurement
error
limit
Device K507 acceptable basic error limit
at current transformers secondary
currents from 0.5
A to
6 A
and
at
secondary
voltage of
voltage transformer
from
50V
to 240V
Current and voltage, %
angle
, min
Current and voltage, %
angle
, min
0
.
1
± 0
.
1
- 3
.
5
+ 6
.
5
± 0
.
001
± 0
.
1
0
.
3
± 0
.
3
- 10
+ 20
± 0
.
003
± 0
.
3
1
± 1
- 35
+ 65
± 0
.
01
± 1
3
± 3
- 100
+ 200
± 0
.
03
± 3
10
± 10
- 350
+ 650
± 0
.
10
± 10
NOTE
.
At current from 0.1 to
0.5 A and
at voltage
from
20 to
50V
K507 acceptable
error value
at all
measurement
limits
is
twice more than
mentioned in
table 1
, 2
and 3.
Resistance measurement
limits
and device
K507
acceptable error limits
at current transformers
resistance calibration
are shown
in table 2.
Table 2
Measurement
limit
designation
Resistance components measurement limit of, Ohm
Device
K507
acceptable basic error limit
at current transformers secondary current from 0.5
A to
6 A, Ohm
Active
Reactive
0
.
3
0
.
3
0
.
6
± 0
.
005
1
1
2
± 0
.
02
3
3
6
± 0
.
05
10
10
20
± 0
.
2
30
30
60
± 0
.
5
100
100
200
± 2
Conductivity measuring range
and
device
K507
acceptable error
limits at voltage transformers
conductivity
in calibration
process
are shown
in table 3.
Table 3
Measurement
limit
designation
Conductivity
components measurement limit of, Cm
Device
K507
acceptable basic error limit
at secondary voltage from 50 to
240 V, Cm
Active
Reactive
Capacitive
Inductive
3 · 10
-4
3 · 10
-4
6 · 10
-4
3 · 10
-4
± 0
.
5 · 10
-5
10 · 10
-4
10 · 10
-4
20 · 10
-4
10 · 10
-4
± 2 · 10
-5
30 · 10
-4
30 · 10
-4
60 · 10
-4
30 · 10
-4
± 5 · 10
-5
100 · 10
-4
100 · 10
-4
200 · 10
-4
100 · 10
-4
± 20 · 10
-5
300 · 10
-4
300 · 10
-4
600 · 10
-4
300 · 10
-4
± 50 · 10
-5
Device
K507
voltage
measurement
limits as
rectangular-
coordinate
AC potentiometer
are as follows:
up to
5mV
- at
operating current 5A
;
up
to 2.5
mV
- at operating current 2.5 A
;
up
to 2 mV
to
- at
operating current 2A
;
up
to 1mV
- at operating current 1A;
up
to 3mV
- at operating voltage 200V
;
up
to 1.5
mV –
at
operating voltage 100 V
.
Device
K507
acceptable basic
error limits at voltage measurement
does not exceed
± 2% of
full scale
sin-phase
voltage
component at nominal
operating current (
voltage).
Device
K507
nominal
current range
for
measuring
current transformers calibration is from 20 to 120
% of nominal current.
Nominal
voltage range
for
device
K507
at
measuring voltage transformers calibration is
from 20 to 120
% of nominal
voltage.
Ampere volt meter acceptable basic
error limits do
not exceed 0.5% of final value of working scale part. Ampere volt meter operating range at current measurement is from 10 to 40% and from 20 to 120% of nominal current. Ampere volt meter operating range at voltage measurement is from 20 to 120% of nominal current.
Triggering alarms wrong turn:
for calibration of current transformers 1-2 A
for calibration of voltage transformers 45-70 V.
Zero indicator normal frequency range is from 30 to 61 Hz. Selectivity zero indicator at third harmonic is at least 60 dB. Zero indicator input voltage deviation of deviation index is at 100 and 10% of maximum value, and not more than 35 dB.
Device
K507
sensitivity with built-in zero indicator is at least 10 mm of its scale in detuning of balanced scheme, turned on for calibration of current transformers at 0.005% reckoned on measurement limit 0.1%, at current in secondary circuit model and verification current transformer is equal to 0.1 A.
Zero indicator power is provided from AC voltage
220 V
at frequency
50 Hz.
power consumed by zero indicator is not more than
10V • A.
Dimensions
710 x 480 x 240 mm.
Weight, up to
24 kg.
Warranty 12mounth.
Delivery term
This device is available in stock right now.
I can send it at one day after your payment.
But due to the fact, that this device is of high precision, it should be calibrated before shipping.
I calibrate and test all my devices. Calibration time may take from
1-14 days.
(depends on device, usually it takes
3 days.
).
I can send it at one day after your payment but without any calibration. Please chose.
I can supply you such device of fresh years of manufacture
2011-2012,
but the price of such device will be approximately 20-40% higher or more.
This device also can be named as:
K507
,
K 507
,
K-507
,
к 507
,
к-507
,
к507
.
Photos
If necessary we can take photos of a device from various angles.
Technical Documentation
In case you didn't find in technical specifications for the device all necessary information you are interested in, feel free to contact me. I will look through the technical documentation for the device and I will be happy to consult you.
Also I may speak directly with the manufacturer and find out more specific information about this product.
If some technical parameters for the device (error, accuracy, measuring range, operating voltage and frequency) do not meet your requirements, please, e-mail me and I will negotiate with the manufacturer whether it is possible to deliver you a device on the desired specifications without a cost increase and in the shortest time.
On delivering the device, electric circuit diagrams and all technical documentation for operation, calibration and maintenance will be supplied. Also there will be documents that testify the accuracy and compliance with specifications.
In addition, translation of technical documentation into the customer’s language may be discussed.
Delivery set
On delivering the device will be completely ready for use.
There are all necessary cables, adapters, sensors and spare parts as envisaged in technical documentation. Hence, there is no point in purchasing any additional repair & measurement equipment.
Warranty
Warranty of this item
- 12 month.
Before sending a device, all devices are checked whether they comply with all technical specifications.
Highly qualified metrology engineers carry out the check-up of every instrument at a specialized laboratory and with the help of master gages.
If necessary, we can send you photos or video with the check-up process.
I ship only fully working devices complying with all parameters.
The warranty for this device is 1 year from the date of shipment from my warehouse.
Within 1 year term I will provide the repair of the device for free in case of manufacturing defect or when the technical parameters do not comply with technical documentation. You will have to pay only for delivery.
When a device is out of order due to your fault (its fall, it is flooded with water, the power supply does not meet the specified technical requirements, input signals exceed the norm, etc.) or there are conspicuous marks of casing opening (broken warranty labels), it is considered a non-warranty repair.
Within 1 year term we can advise you for free on the device operation.
After-warranty service
After warranty termination I can arrange a paid repair and technical maintenance of a device as well as I can sell you all necessary spare parts for repair at minimum prices. I always have them in stock.
Packaging
Immediately after checking, the device will be wrapped in several layers of strong air-bubble film and placed into a strong cardboard box. Extra cardboard plates will be used for fixation.
If necessary, wooden box or pallet may be used. For a more reliable fixation foam can be applied. The whole box will be placed in a waterproof polyethylene bag which will be wound with several layers of packing tape.
A special handle will be made for ease of transportation.
Thus, I guarantee qualitative and conscientious packing of the device that reduces to minimum the possibility of damage during transportation.
Discount (from-10% to -90%)
I suggest you a device which is unique in its class and price category with the following specifications: (accuracy, measurement range, error, temperature operating conditions), endurance and durability (military performance, aluminum, stainless steel, titanium or carbolite casing, shock and vibration resistance, high maintainability and reliability), free measuring kit (cables, adapters, load, fuses, etc.), 1year warranty.
Unused cheap devices with the same specifications, accuracy and durability do not exist.
If you consider the price for this device unreasonably high, and you know the similar equipment at a lower price, please, let me know.
I will help you to compare these two models. In case your model (which is cheaper) is the same as the device I suggest or even it is better, then
I guarantee to sell you a unit at that cheaper price with additional 10% discount.
Shipping details:
Please, mind that I ship from Ukraine (Europe, +2), so that the shipping time may differ from your local time.
I send goods via AirMailpost.
App. delivery time :
Europe – 7-15 days;
USA, Japan&others – 10-20 days (depends on a country).
I will ship in 10-15 business days after payment clearance.
The goods may also be delivered by the express mail services such as DHL, UPS, FedEx, TNT or EMS.
With express delivery you will mostly receive your goods within 3-7 working days.
Payment details:
I expect payment in 4 days after the auction ends.
I accept a PayPal payment as the safest way of payment (preferably).
If you do not have a PayPal account you can pay by wire transfer to my credit card.
Other variants of payment are acceptable, for example in case of pickup way of shipping, i can accept cash payment.
(This will be an official purchase on eBay).
Please, tell me if you cannot pay in time, we can always negotiate it.
When purchasing a few items, you’ll save on shipping.
Return policy:
I accept refunds and returns. If there is something wrong with the device, please, inform me within 5 days after receiving it.
I will refund your costs or send you the other item, as you wish (
after I receive the previous item
).
Please only serious bidders!
